6 Using a git repository
Teaching: 40 min Exercises: 20 min
6.1 Questions
- How do I get a local copy of my repository?
- How do I record changes to my files using git?
- How do I view the status of the repository?
- How do I syncronise the history with GitHub?
6.2 Objectives
- Understand the PC configuration required to use a git repository
- Understand how to create a local copy of a GitHub repository.
- Understand the conceptual areas: working tree, staging area
- Understand the basic update workflow: add to staging, commit with message, push to origin
6.3 Local git configuration
Before we can use git we need to give it some personal information. Every committed change to a repository requires the author’s name and email as metadata. We register this information using the git cli.
6.3.1 Configure your git user information
- Open your terminal, or gitbash or Windows.
- Use these commands to register your name and email address, making sure it’s the same email address you registered with GitHub:
$ git config --global user.email your.email@example.com
$ git config --global user.name "Firstname Lastname"
You can check the value of this configuration by running the same command with no value argument:
e.g.
$ git config --global user.email6.3.2 Configure your text editor
The text editor you configure here is the one git will open so you can write messages that explain your changes. Ideally it is an editor that opens really fast or one you always have open.
6.3.2.1 Set up Atom
The default editor, Vim, is often found to be difficult to use by beginners and is the subject of numerous memes. In this course we will use Atom, which we will have open most of the time. You can change this at a later stage.
Configure it like so:
$ git config --global core.editor "atom --wait"A list of configurations for other popular editors can be found here.
6.4 Anatomy of git cli commands
All git commands we will learn share elements with those you have just seen.
They will all begin with git followed immediately by an argument that defines
the type of command you would like git to perform. In the above example the
command is config. Flags, both - and -- types are used to alter the way
the command is performed. Finally there are additional arguments that are
required to perform the command.
In the example above the first argument is the configuration key, and the second
argument is the value it should take. The --global flag makes the
configuration global, so it will apply to all repositories. Without --global
the configuration applies to only the repository in the current working
directory (In our case there is no such repository).
In summary, the form is:
$ git <command> <command flags> <command arguments>6.4.1 How to git help
Like other cli programs we’ve seen we can get help with --help. This can be
done in the context of git the program or a single command i.e.:
$ git --help
$ git config --help
Help for a specific command will open up a help browser in the terminal, you can scroll with the arrow keys or by paging, and quit with ‘q’.
6.5 Cloning a repository
Cloning is the process of creating a local copy of a remote repository, like one
hosted on GitHub. Before we clone a repository, think about where you will
clone it to. You might like to create yourself a repos folder in your home
folder.
To clone a repository use the clone command followed by 2 arguments:
$ git clone <repository URL> <parent folder>The parent folder is the folder that will contain your repository contents. The folder must be empty or the command will abort. If you leave the parent folder blank, the default behaviour is to create a folder for the repository in the current working directory with the same name as the repository. This is helpful and common usage.
6.5.1 Create a repos folder (optional)
- Use the
mkdircommand to create a folder called ‘repos’ in your home folder (~)
6.5.2 Clone your repository
In your browser:
- navigate to your ‘git_workshop’ repository on GitHub
- Click the green ‘Clone or Download’ button on the right of screen.
- Use the clipboard icon to copy your repository’s URL.
In your terminal:
- Change to the folder that will house your repositories with
cd. - Use this command to clone your repository, with your URL pasted in for ‘
’:
$ git clone <URL>- Enter your GitHub password when prompted and press enter.
Here is some sample output:
miles@miles-macbook:~/repos$ git clone https://www.github.com/milesmcbain/git_workshop.git
Cloning into 'git_workshop'...
remote: Enumerating objects: 3, done.
remote: Counting objects: 100% (3/3), done.
remote: Total 3 (delta 0), reused 0 (delta 0), pack-reused 0
Unpacking objects: 100% (3/3), done.
6.5.3 What makes a git repository?
If you cd into your repository folder and run the ls -a command you will see
a hidden folder called ‘.git’. Have a look at its contents if you like. This is
where git stores all the metadata it needs to operate your repository, including
the complete history of every file ever added.
Be careful not to delete or rename the ‘.git’ folder or your repository will no longer work with git.
6.6 Local repository workflow
At a high level the workflow for your repository is:
- Create, update, or delete local files.
- Move changes to the staging area.
- Commit changes in the staging area to the repository history.
- Push commits to the upstream remote.
There’s a bit of specific terminology here we can break down:
You make changes to files in the repository as you normally would with any file on your computer. Those changes are saved on your computer but they are not recorded in your repository until they are committed. A commit is a record of related (usually) changes with associated metadata about like author, time, date, and reason for change.
A commit is not a snapshot. It is a delta. Only what changed is recorded. Therefore a single commit is not enough to recover a repository. You need all commits in order. You can think of a repository as a timeline of commits. This timeline is commonly referred to as the history.
The staging area is a conceptual area where you can place changes you plan to commit imminently. You might have made many changes for varying reasons, so it makes sense to group them into commits related to the reason. You place files to be committed together in the staging area which feeds into your next commit.
As you make commits, your local repository moves ahead of the remote repository (GitHub). You push your new commits to the remote to bring its history up to the present state of your local repository.
6.7 Status - determining when things have changed
The status command gives us useful information about the status of our work
relative to the local repository history and remote repository.
It can be run with no additional arguments or flags, and it will work from within working directory that is a sub-folder of a git repository. If we run it from within our freshly cloned repository we get:
$ git status
On branch master
Your branch is up-to-date with 'origin/master'.
nothing to commit, working tree clean
Which tells us:
- our local branch
- our repository status with respect to our remote branch history
- if we have uncommitted changes in the repository file structure (the working tree).
6.7.1 Aside: branches
You can think of branches as parallel timelines in your repository history. Branches become necessary as the size of the team and project grows. For this lesson all you need to know is that when you create and clone a repository from GitHub its history contains only one timeline: a branch called master.
6.7.2 Introducing changes
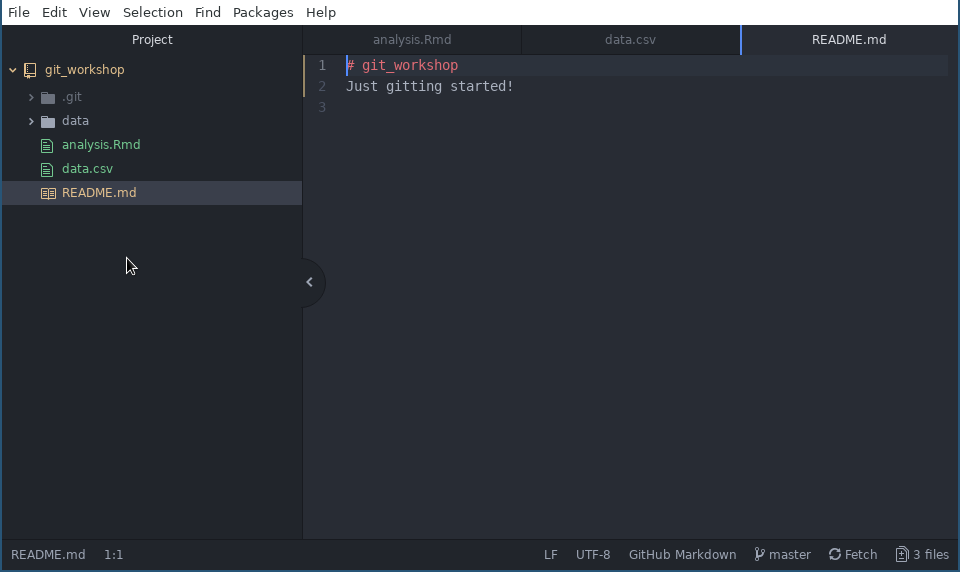
Now we’ll introduce some changes and see how the status changes. Let’s do the following:
- Create a new folder called ‘data’ in our repository with
mkdir - Create a new file in the repository called ‘analysis.Rmd’ with Atom
- Create a new file in the repository called ‘data.csv’ with Atom.
- Change the first line of text under the header in README.md to: “Just gitting started!”
This is what Atom should look like when we’re done:
Running git status again should produce different output along the lines of:
$ git status
On branch master
Your branch is up-to-date with 'origin/master'.
Changes not staged for commit:
  (use "git add <file>..." to update what will be committed)
  (use "git checkout -- <file>..." to discard changes in working directory)

    modified:   README.md

Untracked files:
  (use "git add <file>..." to include in what will be committed)

    analysis.Rmd
    data.csv

no changes added to commit (use "git add" and/or "git commit -a")
Some things of note:
- Our master branch is still up-to-date with the remote repository branch ‘origin/maser’ - no commits have been made.
- git is suggesting commands we could use from here:
add,checkout, andcommit. - git has detected README.md was modified.
- git has detected a new untracked files: analysis.Rmd, data.csv.
- git has not detected our new folder: ‘data’. Git tracks changes to files only.
6.8 Diff - seeing what’s changed
We can ask git to show us exactly what has changed in any file or all files
using the git diff command. It will compare differences in files with the last
committed versions. Colour coded output describing differences appears in the
terminal.
The syntax is:
git diff <path> <flags>If <path> is omitted all files are ‘diffed’ (this is the lingo). A useful flag is --colour-words which will show individual word changes in context, rather than changed lines (the default).
To diff README.md we would do:
git diff README.md6.9 Add - moving changes to staging
The add command moves changed files to the staging area in preparation for a
commit. The syntax is:
$ git add <pathspec>Where the <pathspec> argument is a path to file or folder. In the case of a
folder, all files in the folder will be added to staging. Paths can be formed
using wildcards, *, and short-hands e.g. . - This comes in quite handy for
staging groups of files.
add can be used to add stage an existing (tracked) file the repository knows about or an
entirely new file (untracked) like ‘analysis.Rmd’ in the previous section. The syntax is the
same.
6.9.1 Stage all files in a single command
- Using a single
git addcommand to stage ‘analysis.Rmd’, ‘README.md’, and ‘data.csv’.
Hint: git add --help might have something useful to say regarding the
<pathspec> argument.
6.9.2 Types of files to stage
There are some considerations when staging files:
- Once a file is committed it is hard to remove from the history.
- Beware committing sensitive information like security tokens.
- Git works best with files that are ‘human readable’, i.e. source files.
- binary files or media files cannot be ‘diffed’ to work out delta.
- GitHub has individual file size limit of 100 MB
6.10 Reset - unstaging changes
Git reset is a powerful command that is used in the context of undoing things
we have done locally before pushing. It can reset the staging area and also
reset where we are on our history timeline to a point in the past, allowing
history to be rewritten.
Time travelling and changing history is generally a bad idea and in the worst case can lead to a time paradox, the result of which could cause a chain reaction that would unravel the very fabric of the space-time continuum and destroy the entire universe!
We will just consider the basic usage for resetting staging in this section. The syntax is:
$ git reset <path>- Beware committing sensitive information like security tokens.
To unstage files or folders on the path specified by the
<path>argument. Unstaging everything at once is also an option by omitting<path>:
$ git reset6.10.1 Born for the stage
We made a mistake and should move ‘data.csv’ to the data folder!
- Unstage ‘data.csv’ with
git reset - Move ‘data.csv’ to the ‘data’ folder with
mv add‘data.csv’ to staging in its new location.
6.10.2 Caution: –hard
It is likely in your travels with git that you will be at some stage advised to
do git reset --hard to resolve a problem. The --hard flag will result in all
changes being unstaged and additionally all tracked files being reset to their
last committed state. Clearly there is a risk of work loss. Make sure you
don’t want to keep anything before you do this!
6.11 Commit - recording staged changes
Git commit is how you record staged changes in your history. The main activity
involved in making a commit is writing the commit message which explains the
changes.
The basic syntax is simple:
$ git commitLike add you can run this with your working directory set to any child folder
of a git repository. The command will trigger a new window to open in Atom with
this text:
# Please enter the commit message for your changes. Lines starting
# with '#' will be ignored, and an empty message aborts the commit.
# On branch master
# Your branch is up-to-date with 'origin/master'.
#
# Changes to be committed:
#       modified:   README.md
#       new file:   analysis.Rmd
#       new file:   data/data.csv
#
6.11.1 Aborting a commit
The information provided summarises the current branch and the changes to be committed. This is a good opportunity to sanity check this information before making history. If you spot something fishy, close the file without adding a message and the commit will be aborted.
6.11.2 Completing a commit
To complete the commit you must:
- Write short informative commit message on the first line
- e.g. “added analysis source and dataset”
- You can continue with detailed info on line 3 - line n as needed.
- some good guidelines are here
- Save the file
- Close the file
After you close the file git will return some output to your terminal:
$ git commit
[master c6766f1] added analysis source and dataset
 3 files changed, 2 insertions(+), 1 deletion(-)
 create mode 100644 analysis.Rmd
 create mode 100644 data/data.csv
[master c6766f1] tells us a commit with a hash matching c6766f1 was added to
our master branch. Your hash will be different as they are intended to uniquely
identify the commit. The hashes come in useful when we need to recover past
versions.
6.11.3 Common usage: git commit -m “message”
It is possible to complete a commit without editing a file in a text editor. The -m flag can be followed with a quoted string which will be used as the commit message, like:
$ git commit -m "a short commit message"There are two drawbacks with this approach:
- You do not get the final opportunity to see what is staged and what branch you are on which can be helpful in avoiding mistakes.
- You are discouraged from writing detailed commit messages since typing into the terminal on a single line is cumbersome.
It can be faster though so it might be great for your pattern of use.
6.11.4 Post commit status
Finally let’s check the status of the repository:
$ git status
On branch master
Your branch is ahead of 'origin/master' by 1 commit.
  (use "git push" to publish your local commits)
nothing to commit, working tree clean
As we add commits to our local repository it moves ahead of the remote repository. Git is suggesting that we probably want to push our commits to GitHub (‘origin/master’), and indeed that is the next step.
6.12 Push - sending commits to GitHub
Most common usage of the push command is:
$ git pushWith a working directory that is a child of a git repository.
This will cause all our new local commits to be sent to all configured remote repositories. In the case of our repository, it came configured with a single remote, GitHub, when we cloned it.
As we have discussed, git supports complex decentralised topologies including having multiple remotes. As an example it would be possible to push our commits to remote repositories hosted on GitHub and GitLab simultaneously.
The push command has flags and arguments that support these kinds of scenarios
but you will likely never use them.
If we push our current commit we see:
$ git push
Counting objects: 5, done.
Delta compression using up to 4 threads.
Compressing objects: 100% (2/2), done.
Writing objects: 100% (5/5), 419 bytes | 0 bytes/s, done.
Total 5 (delta 0), reused 0 (delta 0)
To https://www.github.com/milesmcbain/git_workshop.git
   fef3706..ead4b25  master -> master
Note*: You will be asked for your GitHub username as password at this point.
- MacOS and Linux users, type them into the terminal prompts.
- Windows users, a popup will appear - Enter your details and click ‘Login’
6.12.1 GitHub history
- In your browser, navigate to your repository on GitHub.
- You can go straight to
https://www.github.com/YOURUSER/git_workshop, replacingYOURUSERappropriately.
- On your repository page, in the upper left of screen there is a circular arrow clock icon with a ‘commits’ label. Click it to see your repository history.
- In the history view, click the commit hash on the right of screen to see the delta for that commit
6.12.2 Your turn: renaming a file
- In your ‘git_workshop’ repository Rename ‘analysis.Rmd’ to ‘00_analysis.Rmd’.
- Run
git status. - Stage all the changes.
- Commit the changes with an informative message.
- Push the changes to GitHub and verify the remote repository looks as you expect.
- Was this tricky? Discuss with your neighbours what made it complicated.
6.13 Summary
You learned the git commands to support a solo workflow:
- git clone
- git config –global user.name, user.email, core.editor
- git status
- git add, git add *
- git reset (to remove files from staging)
- git commit, commit -m
- git push